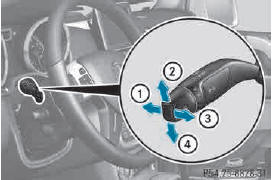
Combination switc
Turn signals

1 High-beam headlamps
2 Turn signal, right
3 High-beam flasher
4 Turn signal, l
► To indicate briefly:
press the combination switch briefly to the pressure point in the direction of arrow 2 or 4.
The corresponding turn signal flashes three times.
► To indicate
: press the combination switch beyond the pressure point in the direction of arrow 2 or 4.
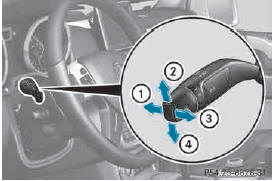
High-beam headlamps

1 High-beam headlamps
2 Turn signal, right
3 High-beam flasher
4 Turn signal, left
X To switch on the high-beam headlamps:
turn the SmartKey in the ignition lock to position 2 or start the engine.
► Turn the light switch to  or
or
 .
.
► Press the combination switch beyond the pressure point in the direction of arrow 1.
In the  position, the high-beam
headlamps are only switched on when it is
dark and the engine is running.
The blue  indicator lamp in the
instrument cluster lights up when the highbeam
headlamps are switched on.
► To switch off the high-beam headlamps
: move the combination switch back to its normal position.
The blue  indicator lamp in the
instrument cluster goes out.
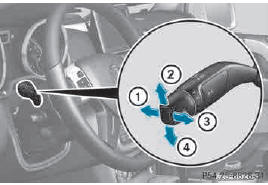
High-beam flasher

1 High-beam headlamps
2 Turn signal, right
3 High-beam flasher
4 Turn signal, left
► To switch on: turn the SmartKey in the ignition lock to position 1 or 2 or start the engine.
► Pull the combination switch briefly in the direction of arrow 3.
See also:
Snow chains
Information about the use of snow chain
compatible AMG winter tires is applicable
for AMG tires. Use of snow chains is only
permissible with these tires.
On some tire sizes there is not enough
sp ...
Mechanical key
General notes
If the vehicle can no longer be locked or
unlocked with the SmartKey, use the
mechanical key.
If you use the mechanical key to unlock and open the driver's door, the
anti-theft al ...
Setting the exterior lighting
Setting options
Exterior lighting can be set using:
Х the light switch
Х the combination switch
Х the on-board computer
Light switch
Operation
If you hear a warning tone when ...
