Changing the rear bulbs
G 55 AMG only: protective grille
Make sure that the protective grille does not hit any painted surfaces.
You could otherwise damage the paintwork.
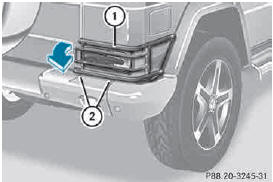
Protection grille (AMG vehicles)
You must remove the protective grille before you can change the bulbs in the tail lamps.
► Unscrew screws 2.
► Swing protection grille 1 to the right.
► After changing the bulbs, swing protection grille 1 to the left.
► Tighten screws 2.
Tail lamp
When installing the lens, make sure that the seal is positioned correctly.
Do not fasten the screws too tightly. You could otherwise damage the lens.
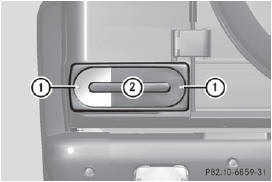
► Switch off the lights.
► Unscrew screws 1.
► Remove lens 2.
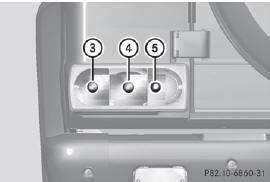
3 Turn signals
4 Brake/tail lamp
5 Tail lamp/standing lamp
► Turn the bulb counterclockwise, applying slight pressure, and remove it from bulb holder.
► Insert the new bulb into the bulb holder and turn it clockwise until it engages.
► Install lens 2.
► Replace and tighten screws 1.
► AMG vehicles: secure the protection grille .
Backup lamp/rear fog lamp
Do not fasten the screws too tightly. You could otherwise damage the lens.
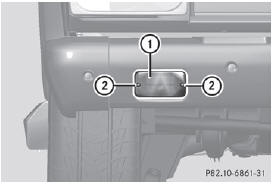
Example: rear fog lamp
► Switch off the lights.
► Unscrew screws 2.
► Remove lens 1.
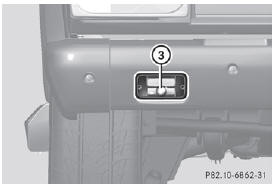
► Turn bulb 3 counter-clockwise, applying slight pressure, and remove it from the bulb holder.
► Insert the new bulb into the bulb holder and turn it clockwise until it engages.
► Install lens 1.
► Replace and tighten screws 2.
See also:
Overview of driving safety systems
...
Maintenance
The Service and Warranty Booklet describes
all the necessary maintenance work which
should be done at regular intervals.
Always have the Service and Warranty
Booklet with you when you bring the ve ...
Useful information
This Operator's Manual describes
all
models and all standard and optional
equipment of your vehicle available at the
time of publication of the Operator's
Manual. Country-specific differences ar ...